A-Shell Preview and EXport ("APEX") is a built-in component of A-Shell for Windows and ATE. At the user’s option or under program control, APEX receives a print file and re-directs it into a preview window. That window displays an image of the report and provides the user with various viewing options (zoom, multiple pages, single page, etc.). After previewing the report, the user may then print the report as it was originally intended to be printed (i.e., to the originally-specified printer), print it under user control (different printer, say, or landscape instead of portrait), or discard it. The purpose of the viewer, as with all such print preview functions, is to make sure that you are printing what you think you are printing—and to save time, energy, money and paper in the process. In some cases, viewing the report may eliminate the need for printing entirely.
APEX offers a variety of controls and options to facilitate viewing the report. Most of these items, and how to use them, are fairly obvious.
APEX also includes a valuable Export to Excel function, which is initiated by a button on the toolbar.
Following are some screen shots illustrating various aspects of APEX.
Title Bar and Tool Bar
The APEX title bar displays information about the report: original filename ("tstz" in this example), the first (-1) printing this session, temporary extension (.APF for "A-Shell print file"), the number of pages in the report, and Windows printer for which this report is intended, and the printer properties being used for printing. The toolbar provides options (in order from left) to set zoom percentage (10% to 999%); zoom in; zoom out; single page; multi-page grid (drop-down menu); page number / back / forward; print setup; print; help; close; print per application; find text (search); open another report; APEX preferences; export to Excel; export preferences.

Multi-Page Grid
Clicking on the multi-page grid option (see toolbar above) offers choices for the layout of multiple pages. You can (barely) see the grid choices below near the top left. The full screen shows the report in the 4 (across) by 2 (down) grid.

Find Text (Search)
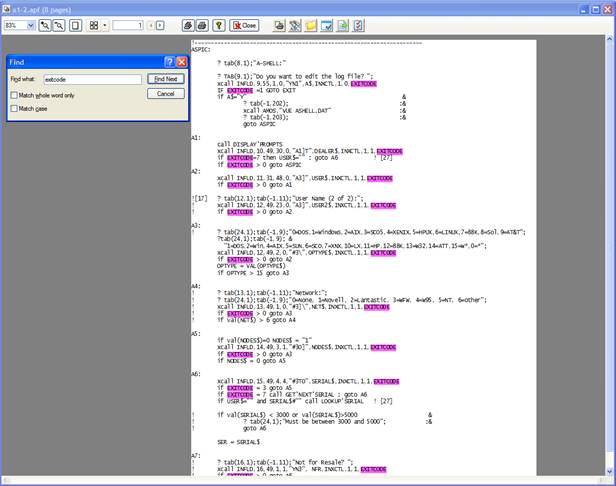
Clicking the find text tool and entering a word into the "Find" dialog box ("exitcode" in this case) causes all the occurrences of "exitcode" on the current (first, in this case) page to be highlighted. Clicking "Find Next" displays the highlighted words on the next applicable page, etc.
