Shown below are the various screen elements that are or can be used in A-Shell.
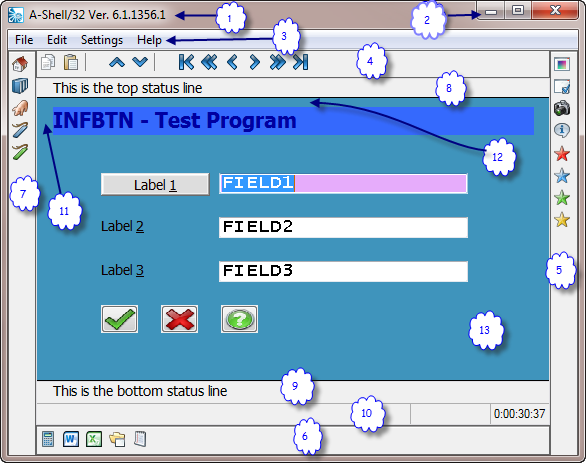
1: Window Title Bar
By default, A-Shell shows its own version, and ATE shows the name of the connection. May be changed programmatically using AG_WINTITLE, or semi-automatically in response to changing conditions using the SET.LIT TITLE definition string.The icon appearing in the upper left corner, which by default is the A-Shell icon, may be changed using the command line switch for Alternate Icon (-g) or, in ATE, via an option in the connection properties dialog.
2: Standard Buttons
The standard Windows buttons, minimize, maximize and close, will always appear unless removed. To remove them, use the command line switch Remove Menu Buttons: (-mx).
3: Standard Menu Bar
Standard menu bar. May be removed via the command line switch No Menu No Menu(-nm), or customized programmatically using AUI_MENU commands.
4 - 7: Toolbars
These are the top, right, bottom, left toolbars. They may be created programmatically using the Toolbar Control winstyle options CCS_TOP, CCS_RIGHT, CCS_BOTTOM, and CCS_LEFT. The thickness of each toolbar is determined by the size of the button images held within, which must all be the same size for a given toolbar but may differ between toolbars. Unlike most other elements of the screen, toolbars do not scale as the window size changes, other than to match the length of the window edge to which the toolbar is attached.
8: Status Line - Top
This is typically used for auxiliary messages from the host application to the user, sent via the tab(-1,128) or (-1,63) commands. The former always starts from the first position on the line, while the latter takes a position code byte for direct addressable positioning. In either case, use tab(-1,129) to terminate the print operation. Status lines may be enabled and disabled using the Settings > Status Lines menu options, or programmatically via the Enable / Disable Status Lines command. For ATE they may also be configured using the Connection Properties dialog.
9: Status Line - Bottom
This is similar to the top status line but traditionally used for "function key labeling". There are actually two bottom status lines which toggle visibility depending on whether the Shift key is down. The unshifted line may be written to via the print commands Tab(-1,130) or (-1,54), full line or addressable position, respectively, while the shifted line may be written to via the Tab(-1,131) or (-1,55) commands. As with the top status line, terminate all status line print operations with Tab(-1,129). See top status line notes for enabling/disabling the bottom status line.
10: Status Line - Session
This line is reserved for messages emanating from A-Shell or ATE; for example, notification of a file transfer or print operation. A running session clock is displayed at the right edge of the line. See top status line notes for enabling/disabling.
11: Margin - Left
This is the left margin of the main display grid. The main display area is divided up into a grid (see #13) of a specified number of rows and columns. After dividing the available display area into the specified columns, the remaining pixels are divided in two and used for left and right margins. For example, if the width of the display area is 1000 pixels and there are 80 columns, then each column will be 12 pixels wide (12 x 80 = 960) with 40 pixels left over, which will be divided into left and right margins of 20 pixels each. To minimize the margin area, you can adjust the size of the window by dragging one of the borders. On some monitors, a maximized window may extend slightly beyond the edges of the visible screen, causing the first and last characters of each line to be truncated. To mitigate that problem, you can force a minimum margin for maximized windows, via the Misc Settings.
12: Margin - Top
This is the top margin of the main display grid. It works the same as the left margin; see #11 for explanation. As with left/right margins, the excess vertical space is divided evenly between the top and bottom margins.
13: Main Display Area
The main display area (grid) is made up of a specified number of rows and columns, usually 24 x 80, but adjustable using the Tab(-5,rows) and (-6,cols); see Terminal Functions and SET.LIT TERMINAL options. In the case of plain text, each character occupies one grid cell, whose size will determine the standard fixed-pitch font. To make that font larger, you can either increase the size of the display area, or decrease the number of rows and columns, or remove some of the status lines and/or toolbars, which otherwise take away from the space available to the main grid. Graphic objects such as proportional font text, edit boxes, buttons and other controls, as shown in the example above, are positioned using the same grid, but are not confined to the one-character-per-cell scheme used for plain text. For more precise positioning of graphic objects, you can make adjustments using Millirows and Millicolumns. The objects themselves are typically created with the AUI_CONTROL.